
Our Website if down for construction for awhile. Not a good time of year but needed to be done. If you need product or help in the mean time please call us at 877-677-3567 Thanks for you understanding.
A slick boat ramp, a frozen riverbank, and algae-coated rocks can turn a routine walk to the water into a hard fall. Knowing how to fit cleats to waders gives anglers, waterfowl hunters, and outdoor workers traction where it matters most: directly under the boot sole, without a bulky harness shifting around your foot.
The job is straightforward, but placement and sole compatibility matter. Install cleats in the wrong area, use hardware that is too long, or force them into a sole that cannot hold them, and you can compromise traction instead of improving it. Take a few minutes to plan the pattern first. Your footing will be more secure for the entire season.
Start With the Right Wader Sole
Cleats work best when the wader has a thick, durable rubber outsole with enough material to hold threaded traction spikes. Bootfoot waders are usually the simplest setup because the boot and sole are built as one piece. Many rubber-soled stockingfoot wading boots can also accept cleats, provided the outsole is sufficiently thick and the manufacturer permits screw-in hardware.
Do not assume every sole is ready for installation. Thin soles, foam-heavy midsoles, worn-out tread, and lightweight footwear with shallow rubber lugs may not provide enough purchase. A cleat that bottoms out against a hard internal layer or pushes through the sole is not a traction upgrade. It is a failure point.
Before you install anything, inspect the bottom of both boots. Look for solid rubber sections between the lugs, not just the high points of aggressive tread. Check the wader or boot maker’s instructions as well. If the manufacturer specifically warns against screw-in cleats, respect that limitation.
For waders with felt soles, use traction hardware designed for felt and follow the boot manufacturer’s guidance. Felt can deliver excellent grip on certain wet rocks, but it is not the same installation surface as rubber. The right cleat and the right sole have to work as a system.
Choose Cleats for the Terrain You Actually Cover
A wader sole often sees more than one surface in a day. You may cross frozen grass to reach a river, walk a gravel trail, climb a muddy bank, then spend hours on wet stone. That mixed-terrain reality is why an integrated screw-in system can be a stronger choice than strap-on cleats that add bulk, collect debris, and alter your natural stride.
Hard, pointed traction spikes bite especially well into ice, packed snow, frozen ground, mud, and slippery roots. On slick river rock, they can add confidence by creating small, aggressive contact points rather than relying on rubber alone. But more is not always better. Excessive cleats can feel harsh on pavement, polished indoor floors, boat decks, and other hard surfaces.
Think about your primary conditions. An angler covering icy access trails and rocky banks may want a balanced, all-around pattern. A worker who spends most of the day on frozen ground may prioritize heel and forefoot bite. If you regularly enter shops, vehicles, or finished floors, remove or cover cleats as appropriate. Metal traction is made for unstable ground, not tile.
How to Fit Cleats to Waders: Plan the Pattern First
Set the waders on a clean, stable work surface with the soles facing up. Brush off mud and dry the outsole so you can clearly see the tread. Never install into a dirty sole and hope the cleat will seat correctly.
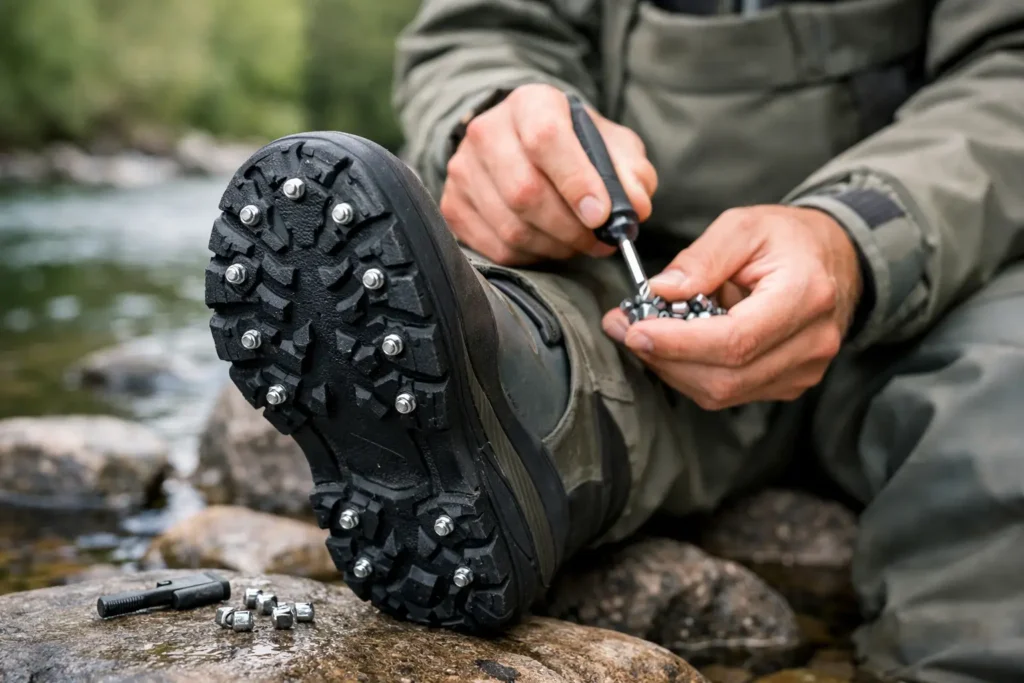
The goal is balanced traction under the zones that carry force during your stride: the heel, the outside edge of the heel, the ball of the foot, and the forefoot. You want the boot to grip when you first plant your heel, remain stable through the middle of the step, and bite again when you push off.
Avoid placing cleats directly on the extreme outer edge of the sole. Hardware mounted too close to the edge has less supporting material and is more vulnerable to tearing or loosening. Also avoid the center arch area, where traction contributes less and can make walking feel unnatural.
A practical wader pattern usually distributes cleats across both the heel and forefoot rather than concentrating them in one spot. Keep the pattern mirrored from left boot to right boot. Your gait should feel even, not as if one foot has more grip or a different contact height than the other.
If your boots have pronounced lugs, place the cleats in the broadest, strongest parts of those lugs or in the thick rubber sections between them. Do not install where a cleat would sit crooked. A crooked spike wears unevenly and may back out sooner.
Install One Cleat at a Time
Use the installation tool recommended for your cleat system. A proper driver keeps the cleat straight and gives you the control to stop when it is seated. Trying to improvise with the wrong tool can strip the cleat head, damage the outsole, or leave the spike at an angle.
Start at the heel. Position the first cleat perpendicular to the sole, apply steady downward pressure, and turn until the cleat seats securely. The base should sit snugly against the rubber. It should not wobble, but do not over-tighten it to the point that the surrounding rubber bulges, cracks, or tears.
Continue across the heel, then move to the forefoot. Check each cleat as you go. If one refuses to bite cleanly, stop and reassess the location rather than forcing it. You may have hit a thin section, a void in the tread, or an internal reinforcement layer.
Once the first boot is complete, use it as your visual reference for the second. Match placement as closely as possible. Exact millimeter-by-millimeter symmetry is not necessary, but the pattern should be functionally balanced.
ICESPIKE screw-in traction systems are designed to install directly into suitable soles, creating a low-profile grip upgrade that stays with your footwear. That direct connection is the point: traction that feels integrated instead of strapped on.
Check the Fit Before You Head Out
After installation, press firmly on every cleat and inspect the sole from the side. Each spike should be seated straight, stable, and clear of the boot’s upper material. Make sure no hardware has penetrated through the sole toward the inside of the boot.
Then test the waders on a safe outdoor surface. Walk slowly on packed dirt, gravel, or another forgiving area. Pay attention to your heel strike and push-off. The boots should feel planted, not lopsided. A small amount of added awareness is normal when wearing cleats, especially on firm ground, but your stride should still feel natural.
Do not make your first test on a steep icy bank or in moving water. Traction reduces risk; it does not erase it. Keep using sound wading habits: take short steps, test uncertain ground, use a wading staff when conditions call for it, and avoid rushing across slick terrain.
Maintain Cleats Through the Season
Screw-in cleats earn their keep only when they remain secure and sharp. Check them before every demanding outing, particularly after long walks on gravel, pavement, or hard-packed trails. Look for missing cleats, loose hardware, bent points, and heavily worn spikes.
A quick inspection takes less than a minute. Turn any loose cleat until it is properly seated, replace damaged pieces, and clear packed mud or ice from the sole. After saltwater exposure, rinse and dry the boots to help protect all hardware and extend service life.
It also pays to check your pattern as the sole wears. A cleat that was safely centered in a thick lug can become too close to an edge after months of hard use. When the outsole is badly worn, replace the boot or wader rather than trying to force more life from a weak foundation.
Know When to Remove Them
The beauty of removable screw-in traction is that you can tune your footwear to the conditions. Leave cleats installed for repeated use on ice, snow, muddy access routes, and slick natural surfaces. Remove them when your work shifts to smooth concrete, indoor floors, delicate boat surfaces, or long stretches of dry pavement.
That flexibility matters for wader users. One morning may demand aggressive grip on a frozen launch, while the afternoon is spent driving, walking through a store, or standing on a clean deck. Use the traction when terrain demands it, and protect both your footing and the surfaces around you.
Secure wader traction is not about turning every step into a stomp. It is about building confidence into the moments that usually cause trouble: the first step off the bank, the hidden patch of ice, the wet rock under moving water. Fit cleats carefully, inspect them often, and let your boots do what they should – keep you moving forward with solid ground underfoot.