
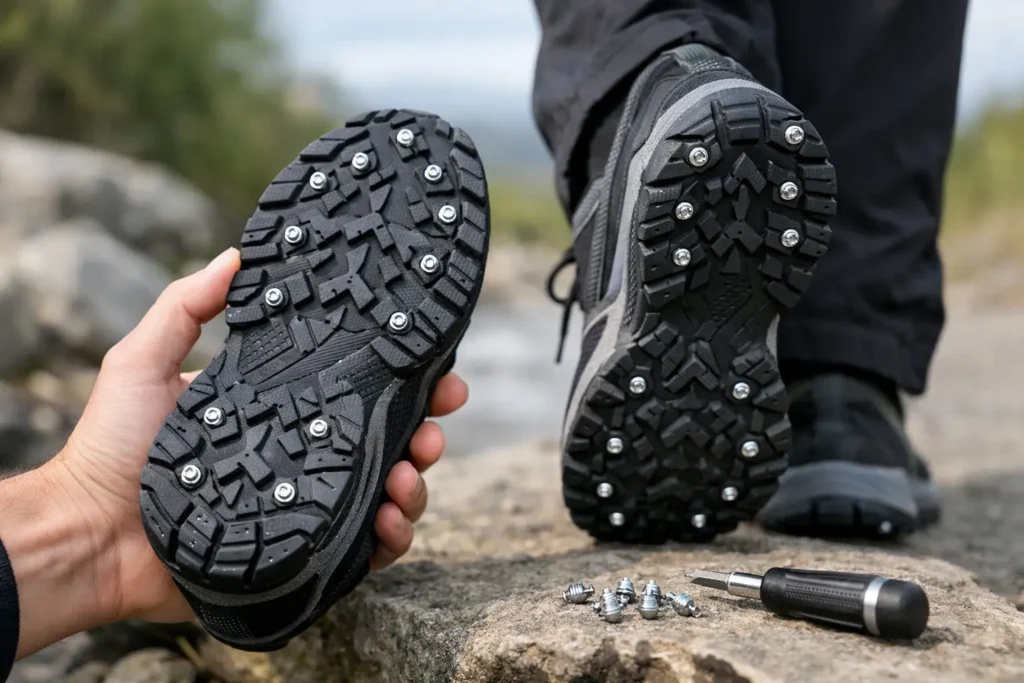
A glazed sidewalk, a frozen loading area, or a steep trail with hard-packed snow can turn ordinary shoes into a liability fast. So, can you put spikes on shoes? Yes – provided the shoe has the right sole, the spikes are installed in the right locations, and you use them on the terrain they are built to handle.
Done right, shoe spikes give you a low-profile traction upgrade that feels far more natural than bulky over-shoe cleats. They bite into ice, frozen ground, mud, loose gravel, and slick roots while allowing your footwear to flex and move as intended. Done poorly, they can damage a thin sole, create uneven footing, or wear down quickly on pavement.
Can You Put Spikes on Any Shoes?
Not every shoe is a strong candidate. The best footwear has a substantial rubber outsole with enough thickness to hold a screw-in spike securely. Hiking boots, work boots, trail runners, winter walking shoes, and many running shoes are often good choices. Their soles are built for repeated ground contact and usually provide enough material for a dependable installation.
Thin fashion sneakers, dress shoes, minimalist shoes with very shallow outsoles, and footwear with exposed air pockets are a different story. A spike needs solid rubber beneath it. If the outsole is too thin, the screw can push through the inside of the shoe or fail to hold under pressure. That is not a traction upgrade – it is a ruined shoe and an unstable step.
Before installing anything, inspect the bottom of the shoe. Look for thick tread blocks, solid rubber zones, and a heel and forefoot that do not flex excessively around the planned installation points. Avoid areas with visible air chambers, very thin rubber, metal shanks close to the surface, or large hollow lugs.
Why Screw-In Spikes Beat Bulky Strap-On Cleats
Traditional strap-on cleats can be useful for occasional icy conditions, but they come with compromises. Chains, coils, and rubber harnesses add bulk underfoot. They can shift while walking, collect snow and mud, and change how your foot rolls from heel to toe. Runners and outdoor workers often feel that change immediately.
Screw-in traction spikes attach directly to the outsole. That matters because the traction stays where it belongs: under the shoe, close to the sole, without a harness wrapping around the upper. The result is a lighter, more integrated feel that helps preserve your natural gait.
This approach also works beyond winter sidewalks. The same low-profile traction can improve footing on wet grass, muddy job sites, loose trails, riverbanks, packed snow, and slick wooded terrain. You still need to match the spike and shoe to the conditions, but the footwear remains practical instead of becoming a single-purpose winter setup.
Choose the Right Shoe and Spike Setup
The right setup depends on what you do in the shoe. A person walking the dog on icy neighborhood streets needs a different pattern than a trail runner moving across frozen dirt, exposed rock, and snow. An outdoor worker may prioritize long wear and stability under load, while an angler may need traction on wet banks and uneven ground.
For most people, the goal is balanced grip. You want traction under the heel for braking and downhill control, plus traction under the forefoot where you push off. The spikes should support your movement rather than create an awkward high point beneath the foot.
A few placement rules apply across use cases:
- Keep spikes away from the outermost edge of the sole, where they are more likely to tear out or create a tippy feel.
- Do not place spikes directly under a very thin, flexible section of the shoe.
- Use the heel and forefoot as the primary traction zones, leaving the middle of the sole less crowded.
- Follow the installation pattern recommended for your footwear type and intended terrain.
More spikes are not automatically better. An overloaded sole can feel harsh on firm ground and may reduce the shoe’s natural flex. Purposeful placement delivers traction where it counts without turning every step into a clunky stomp.
How to Put Spikes on Shoes Correctly
Installation is straightforward, but it should be deliberate. Start with clean, dry soles. Mud, grit, and moisture make it harder to see the tread pattern and can interfere with a secure installation.
First, identify the solid rubber areas under the heel and forefoot. Mark your intended locations if needed. Then use the proper installation tool to drive each spike straight into the outsole. The spike should sit firmly in the rubber, with its traction point exposed and the base seated flush against the sole surface.
Do not force a spike into a questionable area simply to complete a pattern. If a tread block is too small or the rubber looks thin, move to a stronger location. The goal is retention, comfort, and real-world grip.
After installation, press on each spike and visually inspect it. It should not wobble, tilt sharply, or sit halfway out of the sole. Walk a few careful steps on a safe surface to check that the shoe feels even. If something feels noticeably off, stop and inspect the placement before heading onto ice or uneven ground.
ICESPIKE systems are designed for direct-to-sole installation, giving everyday shoes and serious outdoor footwear a tough, lightweight traction upgrade without the dangling chains or shifting harnesses of over-shoe cleats.
Where Shoe Spikes Work Best – and Where They Do Not
Traction spikes are built for surfaces where you need bite: ice, packed snow, frozen mud, loose dirt, wet grass, soft trails, gravel, and slick roots. On these surfaces, they help you plant your foot with more confidence and reduce the sudden slide that causes falls, strained muscles, and hesitation.
They are not meant to be worn everywhere. Smooth indoor floors, finished wood, tile, polished concrete, and delicate flooring can be damaged by spikes. Spikes can also feel slippery or noisy on certain hard, smooth surfaces because there is nothing for them to penetrate.
Bare pavement is another trade-off. Brief walks across pavement are often unavoidable, but long miles on asphalt or concrete will wear traction points faster than snow or dirt. If your route mixes icy patches with long stretches of dry pavement, choose a low-profile setup and understand that durability will depend on how much hard ground you cover.
For runners, this is especially relevant. Spikes can provide serious confidence on winter routes, but they should match the route, not just the weather forecast. A mostly icy trail is a strong use case. A dry urban route with a few frozen puddles may call for a more selective approach.
Check Your Spikes Before They Check Your Footing
Installed spikes are durable, but no traction system is maintenance-free. Inspect the sole regularly, especially after rough terrain, long workdays, or repeated pavement use. Look for worn points, loose spikes, damaged tread blocks, and packed debris around the base.
A quick check takes less time than recovering from a fall. Brush off mud and gravel after use, let wet footwear dry naturally, and replace worn or missing components before the next icy morning. If a spike has loosened because the surrounding sole is damaged, do not keep driving it back into compromised rubber. Move to a sound location if the footwear and installation pattern allow it.
Also remember that traction improves footing, not judgment. Slow down on steep glare ice, use handrails when available, and shorten your stride when conditions are unpredictable. The strongest grip in the world cannot eliminate every hazard, particularly on uneven terrain hidden beneath fresh snow.
The Bottom Line for Safer Steps
Putting spikes on shoes is one of the most practical ways to turn footwear you already trust into serious traction gear. Choose a shoe with a solid outsole, install spikes in durable heel and forefoot zones, and reserve them for surfaces where they can bite. When winter or unstable ground tries to take your feet out from under you, secure footing lets you keep moving with purpose instead of fear.