
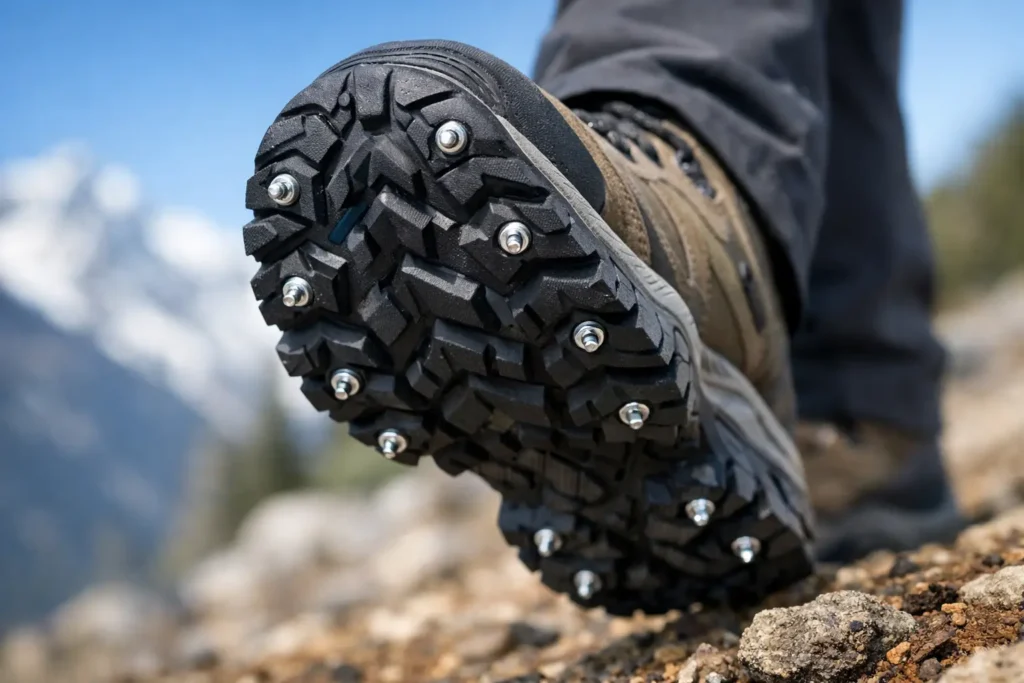
A guide to screw in traction starts where every slip starts: at the sole. When ice hides beneath a dusting of snow, a muddy trail turns to hardpack, or a jobsite walkway freezes overnight, ordinary rubber has limits. Screw-in traction gives your footwear a direct, low-profile grip upgrade built to bite where smooth soles slide.
Unlike strap-on cleats that wrap around the outside of a shoe, screw-in spikes install into the tread itself. The result is traction that moves with your footwear, not around it. For runners, hikers, outdoor workers, anglers, and anyone walking a dog through a hard winter, that difference can mean a more natural stride and more confidence underfoot.
Why Screw-In Traction Feels Different
Traditional over-shoe traction systems can work on solid ice, but they often bring bulk, shifting, and an uneven feel. Chains can catch. Harnesses can stretch or slip out of place. Some designs change the way your foot lands, which is a problem when you are covering miles, carrying equipment, or simply trying to move safely through an icy parking lot.
Screw-in traction is integrated with the shoe or boot. Properly placed spikes sit in the existing tread pattern and create bite points where your foot naturally contacts the ground. There is no outer harness to adjust and no extra hardware swinging below the sole.
That does not mean every shoe should be treated the same. A lightweight road running shoe, a deep-lug hiking boot, and a stiff work boot have different sole thicknesses, tread layouts, and intended use. Strong traction begins with matching the spike setup to the footwear and terrain in front of you.
Choose Footwear That Can Hold a Spike
Start with the sole, not the upper. Look for rubber lugs or solid tread blocks with enough material to accept a screw without pushing through into the shoe. Shoes with thin, flat soles may not provide enough depth. Worn-down footwear also leaves less material for the spike to hold.
A shoe does not need huge mountain-boot lugs to work. Many everyday winter shoes, trail runners, work boots, and hikers have suitable tread blocks. What matters is that there is firm rubber in the right contact zones. Avoid installing spikes into air pockets, foam midsoles, soft hollow lugs, or areas where the sole is peeling away.
Before installation, clean the sole and inspect it closely. Knock out packed mud, stones, and old debris. If a lug is torn, cracked, or nearly worn smooth, skip it and use a sound tread block nearby. Traction hardware is only as dependable as the rubber holding it.
A Guide to Screw-In Traction Placement
Placement should support the way your foot meets the ground. Your heel provides braking control, especially going downhill or stepping onto a slick surface. The forefoot provides push-off and control as you climb, run, or change direction. A balanced installation uses both zones.
For everyday walking on icy sidewalks and packed snow, focus on the outside heel and the forefoot contact area. This helps when your heel first lands and when your toes drive you forward. Keep spikes away from the very edge of the sole, where the rubber can flex sharply and wear faster.
For trail running or hiking on mixed winter ground, distribute traction across the heel and forefoot rather than concentrating all of it in one place. You need bite when climbing, braking, side-stepping around rocks, and crossing frozen ruts. Mixed terrain rewards a balanced pattern because the surface changes with every few steps.
For work boots, think about the movements your job demands. A worker who climbs ladders, carries materials, or walks uneven lots needs secure contact without creating an awkward platform under the foot. Place spikes in substantial tread blocks and preserve the sole’s natural flex points where possible.
Do not crowd every available lug. More spikes are not automatically better. An overloaded sole can feel harsher on firm surfaces and may be unnecessary for your conditions. Use enough traction points for secure contact, then let the shoe’s existing tread do the rest.
Install Spikes With Control, Not Force
Installation is straightforward, but rushing it can damage a good sole. Use the proper driver or installation tool designed for the spike. Position the point at the center of a solid tread block, hold the tool square to the sole, and turn steadily until the spike is seated.
The goal is a secure fit, not maximum force. Driving at an angle can reduce holding strength or send the spike too close to the sidewall of a lug. If you meet unexpected resistance, stop and check the location. You may be contacting a denser internal feature, or the tread block may not be suitable.
Once installed, inspect each spike. It should sit firmly and evenly, without wobbling or protruding in a way that looks misaligned. Walk a few careful steps on a safe surface to get familiar with the feel. New traction changes how the sole contacts the ground, and a quick test helps you confirm that your pattern feels balanced.
ICESPIKE systems are designed for direct-to-sole installation, giving active footwear a lightweight traction upgrade without the bulk and movement of an over-shoe device. The benefit is simple: dependable bite where you need it, while your shoe still feels like your shoe.
Match Your Traction to the Terrain
Screw-in spikes excel on ice, hard-packed snow, frozen mud, slippery roots, gravel, and unstable ground. The metal points create penetration and purchase where rubber alone can skate. They are especially useful during freeze-thaw conditions, when a familiar route can change from clear pavement to black ice in a single night.
They are not a reason to ignore conditions. Smooth wet tile, polished stone, metal grates, and certain indoor surfaces can be slick with any footwear, including traction-equipped footwear. Metal spikes can also feel noisy or aggressive on clean concrete and may wear faster on abrasive pavement.
If your day includes long stretches indoors or on bare hard flooring, removable screw-in traction is a practical advantage. Take spikes out when the season or surface does not call for them, then reinstall them when winter footing returns. That flexibility is useful well beyond snow season. Muddy spring trails, wet rocks near the water, and loose gravel can all demand more grip than a standard outsole provides.
Check Your Spikes Before They Become a Problem
Traction is safety gear, and safety gear deserves a fast inspection. Before a run, hike, shift, or winter walk, turn the shoe over and look for missing, loose, or heavily worn spikes. A spike that has rounded off will not bite like a fresh one. A loose spike should be addressed before it works its way out of the tread.
Clean the soles after muddy or salty outings. Road salt, grit, and packed debris can hide wear and make it harder to inspect the installation. Let wet footwear dry naturally rather than placing it directly against high heat, which can harden or damage rubber over time.
Keep an eye on the shoe itself, too. Deep cracks, separated soles, and severely worn lugs are signs that the footwear may be nearing the end of its useful life. Spikes improve traction, but they cannot rebuild a worn-out boot.
Use Better Footing With Better Judgment
The strongest traction setup is only one part of staying upright. Shorten your stride on glare ice. Keep your weight centered over your feet. Slow down before turns, descents, curbs, and transitions from snow to bare pavement. When carrying a load, give yourself more room and avoid sudden changes of direction.
For runners, that may mean easing your pace through shaded corners and bridge approaches. For hikers, it means testing a steep descent before committing your weight. For workers and everyday walkers, it means recognizing that a frozen patch near a vehicle or doorway deserves the same attention as an icy trail.
Secure footing should not force you into clumsy, heavy gear or make you rethink every step outside. Install traction thoughtfully, inspect it regularly, and let your shoes do what they were built to do: move you forward with confidence when the ground refuses to cooperate.