
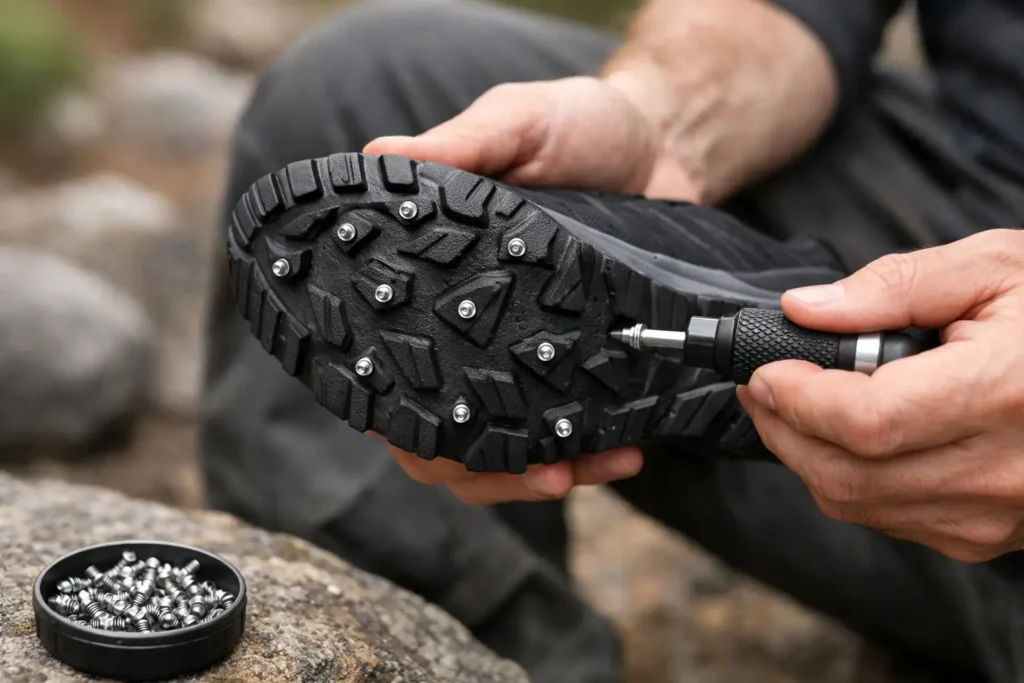
A frozen parking lot, a shaded trail switchback, a wet dock after a hard freeze – these are not places to test your balance. Knowing how to install shoe spikes correctly turns footwear you already trust into a serious traction tool, without adding the loose fit, weight, and awkward gait of strap-on cleats. Done right, screw-in spikes sit tight in the sole, bite into unstable ground, and let you move with confidence.
Start With the Right Shoe or Boot
Shoe spikes work best when the sole gives them enough material to hold. Look for a rubber outsole with a defined tread and a reasonably firm base. Hiking boots, work boots, trail runners, winter walking shoes, and many everyday boots are strong candidates. The deeper and more substantial the lug pattern, the more placement options you have.
Avoid installing spikes in soles that are extremely thin, badly worn, cracked, or separated from the upper. A spike cannot compensate for footwear that is already failing. Smooth dress-shoe soles and foam-heavy running shoes can also be poor choices because they may not provide enough durable rubber for a secure hold.
Check the bottom of each shoe before you begin. Remove packed mud, gravel, and road salt, then let the sole dry completely. Clean rubber gives you a clear view of the tread and helps you keep the spike positioned where it belongs.
Choose Placement for How You Move
There is no single spike pattern for every person or every surface. A runner pushing through icy miles needs coverage that supports forward motion. A delivery driver stepping in and out of a truck needs dependable grip at the heel and forefoot. A hiker on frozen, uneven trail needs balanced traction across the areas that meet the ground.
The goal is simple: place spikes in the thickest, flattest parts of the outsole that make consistent contact with the ground. Keep them away from hollow channels, air pockets, very thin tread edges, and the softest areas of the sole. Never install a spike where it could penetrate through the shoe or interfere with a built-in support structure.
For most boots and shoes, start by planning traction under the heel and the ball of the foot. The heel helps control slips when your foot first lands. Forefoot traction helps you push off securely and maintain control on inclines, packed snow, mud, gravel, and slick roots.
Match the Pattern on Both Shoes
Lay your shoes sole-up side by side and mirror the pattern from left to right. Symmetrical placement matters. If one shoe has aggressive heel traction and the other does not, your stride can feel uneven when the ground gets slippery.
Do not crowd every available lug with metal. More spikes are not automatically better. Overloading a sole can make hard pavement feel harsher and can put unnecessary stress on thin tread. Install enough spikes for the conditions you face, using open, sturdy areas of rubber rather than forcing a dense pattern into marginal spots.
Tools You Need Before Installation
Screw-in shoe spikes are designed to install directly into the outsole with the correct driver tool. Have your spikes, driver, footwear, a stable work surface, and a cloth or stiff brush ready. If the shoe is cold and stiff from being left in a garage or vehicle, bring it indoors first. Rubber is easier to inspect and work with at moderate temperatures.
A bench, table, or floor with a towel underneath can work well. What matters is stability. Hold the shoe firmly with the sole facing up so the driver stays square to the rubber. Rushing while the shoe shifts is how spikes end up crooked.
If you are installing ICESPIKE traction spikes, use the driver made for the spike style you purchased. A proper tool gives you control and helps the spike seat securely without damaging the head.
How to Install Shoe Spikes Step by Step
Begin with one shoe and follow the same pattern on the other. Work slowly for the first few spikes. Once you feel how the threads bite into the sole, the process becomes fast and straightforward.
1. Mark Your Intended Locations
Use the tread itself as your guide. Choose thick rubber lugs or solid outsole zones, then lightly mark the center of each location if needed. Inspect from the side as well as the bottom. You want enough sole thickness beneath every point.
2. Set the Spike Straight Against the Sole
Place a spike in the driver and position its point against your first selected location. Keep the driver perpendicular to the outsole. Starting at an angle can cause the spike to track sideways, reducing its holding power and leaving the head uneven.
3. Turn With Firm, Controlled Pressure
Press the spike into the rubber while turning the driver clockwise. Let the threads do the work. You should feel steady resistance as the spike bites and advances. Keep the pressure controlled rather than forcing it with sudden hard twists.
If the spike will not start cleanly, stop. Check that you are centered on solid rubber and that the driver is square. Moving it slightly to a better section of tread is smarter than muscling it into a weak spot.
4. Seat the Spike Flush
Continue turning until the spike head sits flush against the outsole or is seated as specified for your model. It should feel secure, not loose or wobbly. Do not over-tighten. Driving a spike too deeply can damage the surrounding rubber, especially on a thinner sole.
A correctly installed spike looks integrated with the tread. The head sits tight, the point faces outward from the sole, and the surrounding rubber is not torn or pushed apart.
5. Repeat the Pattern and Inspect It
Install the remaining spikes, alternating between heel and forefoot positions as you work. This helps you keep the pattern balanced. When both shoes are finished, inspect every spike by hand. Confirm that each one is straight, firmly seated, and clear of any thin or damaged sole area.
Test Them Before You Trust Them
Your first test should happen on a controlled surface, not halfway down an icy driveway. Walk across a clean garage floor, packed dirt, or another safe area and pay attention to how the footwear feels. You want secure contact without a rocking sensation or a spike that catches unexpectedly.
Then move to the terrain you actually expect to encounter. Take short, deliberate steps at first. On ice, keep your weight centered and avoid lunging forward. Shoe spikes add powerful bite, but they are not permission to sprint across black ice or ignore changing conditions.
Expect a different feel on bare concrete, tile, hardwood, or finished indoor floors. Metal traction is built for unstable outdoor surfaces, and it can be noisy, uncomfortable, or damaging indoors. If your spikes are removable, take them out when your route is mostly smooth indoor flooring or dry pavement.
Common Installation Mistakes That Cost You Grip
The most common mistake is placing spikes only in the center of the sole. The center may look convenient, but it does not always contact the ground during your natural stride. Heel and forefoot zones usually deliver more useful traction because they carry the load as you land and push off.
Another mistake is installing spikes in soft foam or on a thin tread edge. The spike may hold initially, then work loose under repeated flexing. Choose dense outsole rubber whenever possible.
It is also easy to make the pattern too aggressive for your use. If you walk from icy sidewalks into offices, stores, or vehicles all day, a moderate setup may be the practical choice. If you run winter trails, work outdoors, or hike through mixed snow and mud, broader coverage may make more sense. Your terrain should determine the setup, not a one-size-fits-all pattern.
Finally, do not skip routine checks. Before a run, hike, shift, or winter walk, turn each shoe over and inspect the spikes. Replace worn spikes and re-tighten or reinstall any that have loosened. A 30-second check protects the traction system you rely on when footing gets unpredictable.
Keep Your Spikes Working Through Every Season
Screw-in traction spikes are not only for glare ice. They can add control on loose gravel, rain-slick rock, muddy job sites, steep leaf-covered ground, and frozen trail debris. That versatility is the advantage of direct-to-sole traction: your footwear stays familiar, your natural gait stays intact, and your grip is ready when conditions turn ugly.
After use, rinse off mud, salt, and grit, then dry the soles before storing your shoes. Road salt and wet debris can shorten the life of both your footwear and the hardware. Check the rubber around each spike for tearing or excessive wear, especially after long miles on abrasive pavement.
Install carefully, inspect regularly, and choose placement that fits the ground under your feet. When winter throws ice, slush, and unstable terrain into your path, secure traction lets you focus on the route instead of fearing the next step.