
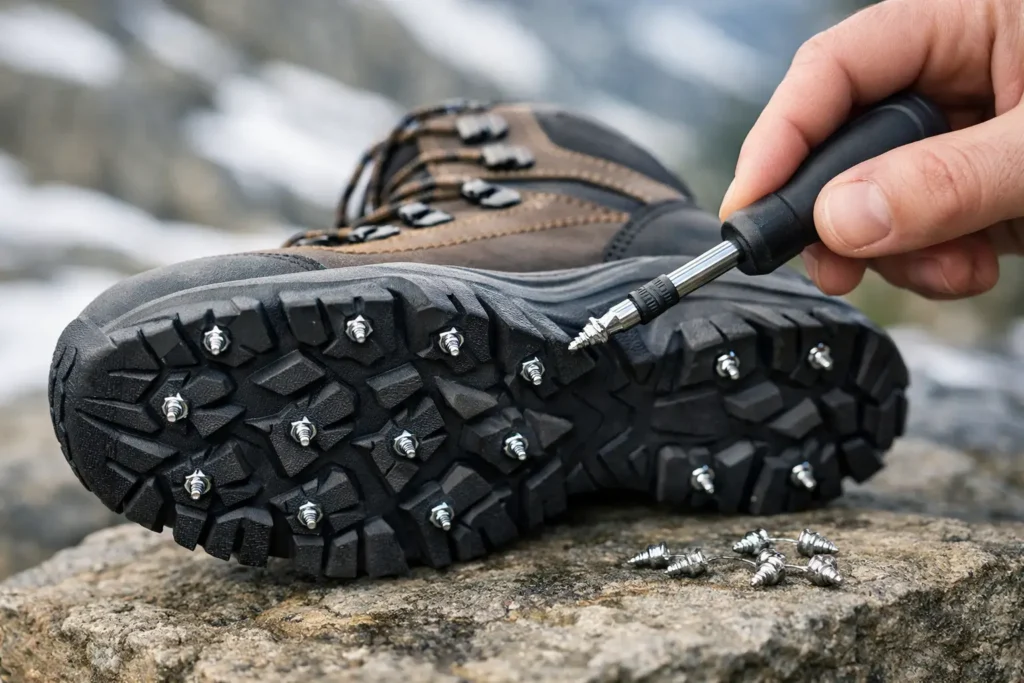
A frozen creek crossing, a shaded north-facing trail, and a steep descent can turn a dependable pair of hikers into a slip risk fast. Learning how to spike hiking boots gives you a direct-to-sole traction upgrade that stays with your boots, preserves a natural stride, and puts grip exactly where you need it.
For hikers who regularly face ice, packed snow, mud, wet roots, loose gravel, or mixed winter trails, screw-in spikes can be a smarter answer than bulky strap-on traction. They do not shift underfoot, collect snow in a harness, or force you to change your gait. But installation matters. The right spike pattern, proper spacing, and a few minutes of careful prep are what turn a good idea into hard-working trail traction.
Start With Boots That Can Hold Spikes
Not every hiking boot is a good candidate. The best boots have thick, firm rubber outsoles with defined lugs and enough material between the tread surface and the midsole. Traditional hiking boots, many work boots, and sturdy trail footwear are often excellent choices. Thin running-shoe soles, foam-heavy outsoles, and badly worn tread need a closer look before you install anything.
Turn the boots upside down and inspect the sole. You need flat or slightly recessed areas of solid rubber where a spike can bite securely. Avoid mounting points too close to the outer edge of the sole, on soft flex grooves, or directly into shallow lugs that cannot support the screw. A spike needs enough rubber around it to stay planted when your weight twists, climbs, and brakes downhill.
If your boots have a waterproof membrane, that is not automatically a problem. The spikes install from the bottom into the outsole, not through the upper. Still, do not use screws longer than the sole can safely accommodate. When in doubt, choose traction hardware designed specifically for footwear rather than improvised sheet-metal screws.
Choose Spikes for Your Terrain
The best setup depends on where you hike. Sharp, hard-metal screw-in spikes are built for bite on ice, packed snow, slick rock, frozen dirt, and hard trail surfaces. They can also add confidence on muddy approaches and loose, unstable ground.
For mostly icy trails, prioritize hard, aggressive points that can penetrate the surface. For mixed ground, including exposed rock, dirt, pavement, and snow, a lower-profile traction spike can be more practical and more comfortable. It will not feel like you are walking on a row of high points every time the trail changes.
This is the trade-off: more aggressive spikes generally deliver more bite on hard ice, but they can feel louder and less natural on bare rock or indoor floors. There is no single layout that is perfect for every mile. Build for the conditions you encounter most, not the conditions you see once a season.
Plan Your Hiking Boot Spike Pattern
Before installing a single spike, map the sole. Most hikers need traction in three working zones: the heel for braking on descents, the forefoot for pushing uphill, and the outer edges for stability when the trail tilts or footing breaks loose.
Start with a balanced pattern rather than packing every available lug with hardware. A practical setup often uses several spikes across the heel and several through the forefoot, with enough space between them that each point can engage the ground. Keeping the pattern symmetrical from left to right helps maintain a consistent gait.
The heel deserves special attention. On a downhill sheet of ice, your heel strikes first and carries the braking load. Place spikes in the broadest, thickest heel lugs or rubber zones, staying clear of the very edge. At the forefoot, position spikes beneath the ball of the foot and toward the toe area where you naturally push off.
Do not place spikes in the center of major flex channels. Hiking boots need to bend as you walk. Hardware installed in a deep groove can loosen prematurely, create an uneven feel, or interfere with natural movement. Likewise, avoid placing every spike around the perimeter only. Edge grip is useful, but you still want solid contact beneath the center of the heel and forefoot.
How to Spike Hiking Boots Step by Step
Set up on a stable work surface with the boots clean and completely dry. Dirt and packed mud make it harder to see the sole structure and can keep the spike from seating correctly. Have your spikes, the manufacturer-provided driver tool or a compatible bit, and a marker ready.
Mark the placement first
Use a marker to identify each installation point before driving anything in. Check the layout from both sides and compare the left boot with the right. The goal is not laboratory-perfect symmetry, but the two boots should have a similar traction pattern and feel.
Keep your marks in solid rubber, away from sidewalls, deep channels, and visibly thin sections. If one proposed spot looks questionable, skip it. A slightly lighter pattern installed in strong rubber beats a crowded layout that risks pulling out.
Drive each spike straight and secure
Position the spike perpendicular to the sole. Apply steady pressure with the correct tool and turn it slowly until the spike is fully seated. The base should sit snugly against the rubber without wobbling, and the traction point should face outward as designed.
Do not overdrive the hardware. Cranking past the seated point can damage the rubber, strip the mounting area, or reduce the spike’s holding power. If a spike goes in crooked, remove it, inspect the spot, and use a nearby solid section rather than forcing the same hole.
Purpose-built systems such as ICESPIKE are designed to provide direct-to-sole traction without the bulk and shifting common with strap-on cleats. Whatever system you choose, follow its specified installation tool, hardware length, and spacing guidance.
Check the sole from every angle
Once the pattern is installed, set both boots on a flat surface. Look for spikes that sit higher than the others, lean to one side, or appear too close to a sole edge. Press firmly on each mounting point with your thumb. Nothing should spin, rock, or feel loose.
Walk slowly across a safe, hard surface outside. You are checking for stability and balance, not testing maximum grip yet. The boots should feel planted and predictable. A mild awareness of the spikes is normal, especially on concrete, but one sharp pressure point or a noticeably uneven step is a sign to inspect the placement.
Test Traction Before the Big Hike
Do not make your first test a steep, remote route. Start on a controlled patch of packed snow, frozen ground, or another low-risk surface. Walk forward, turn, step sideways, climb a short incline, and practice braking downhill. This reveals whether the heel and forefoot are engaging as intended.
Remember that spikes improve traction, not judgment. Black ice, wet rock, wind-packed snow over hard ice, and steep sidehills can still be dangerous. Shorten your stride, keep your center of gravity over your feet, and use trekking poles when the terrain calls for them. Strong traction gives you more control, but it does not make unstable terrain harmless.
Maintain Spiked Boots for Season-Long Performance
Check your spikes before each outing, especially after long hikes on rock, gravel, or pavement. Hard surfaces can gradually wear points down, while mud and trail debris can hide damage. A quick visual inspection takes less than a minute and can prevent a surprise failure when conditions turn slick.
After wet or muddy hikes, rinse the outsole and let the boots dry naturally. Clear packed dirt from around the spike bases so you can inspect them properly. Replace any worn, bent, or missing hardware promptly. If you are moving from winter trails to dry summer terrain, removable screw-in traction lets you adjust the boot to the season instead of buying a separate pair of footwear.
Avoid wearing spiked boots on finished indoor flooring, vehicle pedals, ladders, or other surfaces where metal traction can damage the material or reduce stable contact. Take the same practical approach around delicate rock and trail infrastructure. Use the grip where it earns its keep.
A well-spiked hiking boot is not about adding more metal for the sake of it. It is about creating dependable contact when the ground stops cooperating. Install thoughtfully, test close to home, and let every climb, crossing, and descent start with more confidence underfoot.